

This post is about my kitchen cabinets that I painted a year ago. It's a long one so grab a drink or a snack and sit back and relax for a little bit.
I love painting. Whether it be an actual painting, walls or furniture, I love it all. Paint can transform anything almost instantly. I think it also gives the most bang for your buck.
We do a ton of painting. In fact, I feel like we're always in the middle of painting something. When I was off work last year for twelve weeks after shoulder surgery I painted two rooms with my left arm in a sling. After I was set free of the sling I decided it was time to paint our hideous, mystery stained, construction grade honey oak cabinets. I knew if I didn't do it now while I was off work it would take me forever and a day since the last thing I would want to do after an exhaustive day at work is more work (even though I usually do...tis life) and our kitchen would be torn apart and a bigger hot mess than usual for years. Ok, maybe not years but it would be a long, long time.
I had decided a few years back that I wanted light "glazed" cabinets after seeing how beauteous they could look when Cory painted and glazed the kitchen cabinets at one of the apartments with Rustoleum's Cabinet Transformations in the linen color that we had picked up in the clearance paint section at Lowe's. It truly transformed those cabinets. They were mismatched and some were metal, some laminate and some wood. Afterwards the kitchen looked cohesive and just absolutely stunning compared to how it looked before. After seeing what Cabinet Transformations did to those cabinets we were firm believers and knew we would do our own cabinets someday.
 I happened to find some after shots of the cabinets Cory did. Although it's a typical awkward-thrown in there where ever it fit-Victorian duplex kitchen it now matches and it looks very nice. For some reason the upper cabinets look a different color ( I could be seeing things) but they are definitely all the same color.
 When that someday finally came I set to work and took down the smallest and worst stained door just to see how it would turn out. I got super lucky and found two large pure white kits on sale for $45 each on Home Depot's website. That's about half price (at least it was then)! So I did a little chair dance and went to put them in my cart and realized they were out of stock. I was bummed out for about 2 minutes and then I remembered my trusted old friend, (where I've always got the best deals for years!) eBay. What do you know the same deal was on eBay, actually it was better at $89 for a lot of 2 and I didn't have to pay tax. So I got two kits for the price of one!!
I did the all the steps in the process: degloss (scrub clean), wait, paint a coat, wait, paint another coat, wait, glaze with a foam brush, wipe glaze off with cheesecloth to get desired effect, wait, paint clear coat, wait some more, then (finally) done! I must say I painted two coats (recommended) and if I was leaving them pure white I would have had to paint more coats as it was still see-through. Also the glazing is the most difficult and time consuming part. By the time I was half way through I loathed the glazing. It definitely takes some finesse and patience.


 Here's a couple pictures from right after we moved in. You can really see the staining on the cabinets (even though I tried to use the light fixtures to camouflage them).
 We really had no choice on painting the cabinets. We had to either paint them, reface them or replace them. Since we don't (and probably never will *sigh*) have 20 G's laying around to buy gorgeous new cabinets, we did the next best thing by painting them and saved a boat load of money.


 I am 95% satisfied with our cabinets. Don't get me wrong I am 99% satisfied with rustoleum cabinet transformations, everyone should go out and buy it immediately if they are planning on painting their cabinets or a piece of furniture!!
I love painting. Whether it be an actual painting, walls or furniture, I love it all. Paint can transform anything almost instantly. I think it also gives the most bang for your buck.
We do a ton of painting. In fact, I feel like we're always in the middle of painting something. When I was off work last year for twelve weeks after shoulder surgery I painted two rooms with my left arm in a sling. After I was set free of the sling I decided it was time to paint our hideous, mystery stained, construction grade honey oak cabinets. I knew if I didn't do it now while I was off work it would take me forever and a day since the last thing I would want to do after an exhaustive day at work is more work (even though I usually do...tis life) and our kitchen would be torn apart and a bigger hot mess than usual for years. Ok, maybe not years but it would be a long, long time.
I had decided a few years back that I wanted light "glazed" cabinets after seeing how beauteous they could look when Cory painted and glazed the kitchen cabinets at one of the apartments with Rustoleum's Cabinet Transformations in the linen color that we had picked up in the clearance paint section at Lowe's. It truly transformed those cabinets. They were mismatched and some were metal, some laminate and some wood. Afterwards the kitchen looked cohesive and just absolutely stunning compared to how it looked before. After seeing what Cabinet Transformations did to those cabinets we were firm believers and knew we would do our own cabinets someday.


I did the all the steps in the process: degloss (scrub clean), wait, paint a coat, wait, paint another coat, wait, glaze with a foam brush, wipe glaze off with cheesecloth to get desired effect, wait, paint clear coat, wait some more, then (finally) done! I must say I painted two coats (recommended) and if I was leaving them pure white I would have had to paint more coats as it was still see-through. Also the glazing is the most difficult and time consuming part. By the time I was half way through I loathed the glazing. It definitely takes some finesse and patience.
This is a cell phone pic of the first door I painted just to see how it would look since Cory thought pure white was wayyy too light. I thought it looked really good and it worked perfect for the tuscan, old world look I was (subconsciously) going for. I painted the desk area next and was kind of wishy washy on how it looked after that. I think I was being too hard on myself, expecting perfect, professional results, since everyone who saw it raved about how great it looked.
It must have looked alright because immediately after seeing my in-progress kitchen my bestie Mel went out and bought Cabinet Transformations in cabernet and painted her cabinets. Then Cory's sister Erica came over and after she saw our cabinets she also bought the pure white kit and did her kitchen cabinets in white, you can see the post she wrote about her experience On Bliss Street. I guess my little ole kitchen started a cabinet renovation revolution of sorts. My kitchen-the trend setter.
It made me feel a little better about how my paint/glaze job was turning out after seeing how it inspired people to go out and change their kitchens too!
Below are a couple of in-progress cell phone pictures. I did not take any with my camera since I guess this wasn't a process I wanted to capture for our family photo album.
In the first picture I was so proud of myself for climbing up on the counter and screwing all those awkward and (some) heavy cabinet doors in by hand (I didn't have the strength to hold the heavy drill) that I snapped a pic and sent it to Cory. On the far right edge you can see the ugly old oak cabinet peeking out.
I did the whole kitchen in sections and used my glass kitchen table and the island as my work space. Any paint that got on the counter or table just scraped right off with a scrub pad. Who knew glass tables made such great work/paint surfaces!
For the most part I worked on the cabinets when Jackson was in bed. I listened to the TV as it cycled through Big Bang Theory and Conan almost every night since I wanted something light, that wouldn't distract me from the task at hand. I would finish up for the night at around midnight (when Cory got home) or shortly after. Every once in a while I glazed a door or painted a coat on or even deglossed a door while Jackson was awake but that was rare. Since I mainly did everything at night it took me about a month to complete this project completely on my own.
I lied just a little, Cory did help me hang the two huge cabinet doors and he put the lazy susan door back on. But otherwise I did everything all by my lonesome.
Below is a picture of Jackson "helping". That kid really does know how to use a screwdriver, he takes things apart all the time much to my surprise and dismay. A word of advice for those of you planning to paint your cabinets with a lazy susan cabinet: don't remove it. Leave it be and paint it, unless it's already messed up. It took Cory the better part of a day to get that cabinet door right. He said he remembered our contractor spending a lot of time putting the lazy susan door back on too (which always got stuck and rubbed until Cory fixed it).
Here's some before construction pictures the day we closed on our foreclosed property.

I will forever wonder what the mystery stains smeared in the shape of letters were from. It's probably better that I don't know...


Finally here are some after pictures. Please ignore my finger print magnet fridge. I've become so numbingly used to it I didn't realize there were smudges all over it until I saw these pics!


I'm going to be completely honest about why I'm not 100% happy. I could lie and say how great my kitchen looks to make it easy and make myself look good but I'm not going to do that, it wouldn't be right. So the 4% is my glaze job. I do love the look, there's just something that I'm not completely satisfied about. Everyone else thinks it looks fabulous. Maybe it's because I did it myself and I'm really hard on myself when it comes to stuff like this. I dunno. It's kind of like a painting that I'm not completely happy about so it gets stashed behind a bunch of other paintings to be "reworked" years later. Except this is out in the open, for me to see. Everyday. Believe me when I say I will be satisfied and 100% happy by the time I'm done with this kitchen. I have some ideas on making it look even better and those may come to fruition very soon...
The remaining 1% is a slight amount of chipping that occurred on one cabinet door and on the bottom corner of the island. I don't blame cabinet restorations. I blame us. I may have missed those spots when I clear coated since it was so hard to see on the light color. I also blame one small child/wrecking ball named Jackson. On my next post I will share with you all how easy it is to fix these chips.
After all is said and done I really must say that I love cabinet restorations. It far exceeded my expectations. The only fault I can find in my cabinets is my own glazing abilities and that (I'm sure) is because I'm an extreme novice cabinet glazer. If I ever did it again I would use a fine tipped paintbrush instead of a foam brush to brush the glaze on the inside part of the cabinets for more precision and to keep the glaze exactly where I want it. Overall I think cabinet restorations is a wonderful product and I highly recommend it. It has worn extremely well, besides the couple of chips. Any food or spills, that most of the time I freak out thinking they are chips and gouges, wipe off easily with a damp rag.
After I was done I still had quite a bit left over, enough to paint all the woodwork and the fireplace white in the living room. So I got two rooms painted for $89! I bought all 34 oil rubbed bronze knobs and pulls off of (where else?) eBay for about $50. So overall, with having so much leftover paint, I'm guessing it cost me a little over $100 to basically have new cabinets!
Cabinet transformations has truly transformed my kitchen and made me love to be in there. I'm also no longer embarrassed about my ugly stained cabinets. However I don't know if I would do it again as it was so labor intensive.
Actually, yes, who am I kidding, I would totally do it again in a heartbeat. It was A LOT of work but it was well worth it to save so much money to get such a high price look.
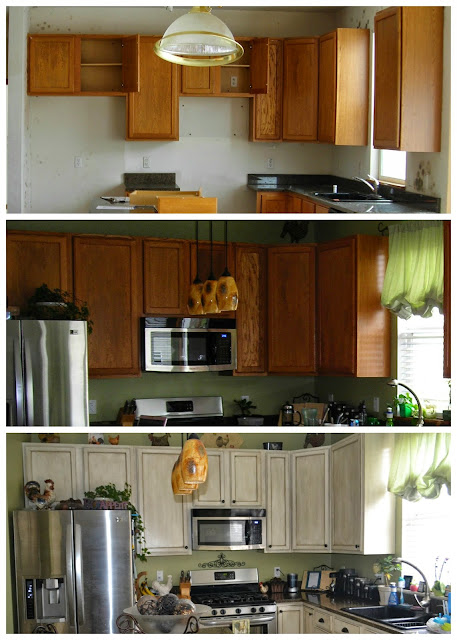
Here's a before-before, before and after shot of my cabinets.

Thanks all for bearing with me through that long post!


Wow that's amazing! Looks like a totally different kitchen! Awesome!
ReplyDeleteThat really lightens the place up! I'm totally thinking when I buy a house I want to go white with my cabinets.
ReplyDeleteWow, Sherri... that turned out awesome! Good job you and thanks for sharing! xxAshleigh @SimplyWright
ReplyDeleteThanks so much ladies :) I'm glad I made the leap and changed my cabinets!!
ReplyDeleteWow, awesome! We have cabinets that are a nice style but I'm not crazy about the finish so I'm planning to paint ours too someday
ReplyDeleteOh wow, this really transformed the space. Gorgeous! And I love your black table, great contrast.
ReplyDeleteWow! Love these cabinets! This is the same color that I was looking into. I wasn't sure if I wanted a pure white or this vintage style. Gorgeous!
ReplyDeleteThey look great!
ReplyDeleteWhat a great transformation! Lots of hard work definitely paid off! I wanted to let you know I've included you in the Very Inspiring Bloggers Award. The post is up on my blog today.
ReplyDeleteThanks so much Beverly!! :)
ReplyDeleteThis really turned out great, Sherri; it made a huge difference in your kitchen! We had our kitchen cabinets painted SW Dover White three years ago, and I am sooo happy with them. I was so tired of our old, worn-out, dark cabinets; I feel like I'll want white cabinets from now on. :)
ReplyDeleteThanks for sharing and have a good week!
Hugs,
Denise at Forest Manor
Yes Denise, I love having light cabinets :) it really brightens the space. I'll probably have light cabinets from now on too!
ReplyDeleteWhat a difference... your lighter kitchen must be much more pleasant for cooking and baking now. :)
ReplyDeleteI can't believe you did ALL those cabinets and for that price! Amazing!
ReplyDeleteThank you so much for sharing on Something to Talk About!
Karen
What an amazing money saving job, I agree it makes your kitchen brighter and I love the color on the walls.
ReplyDeleteI totally renovated my kitchen some years ago, tearing out "everything"replacing all the cabinets, counters and at that time I used vinyl wall covering and replaced the stove and dishwasher, I did it all in 1 weeks time. But I had the help of the cabinet company that did the install my husband and I did the rest.
Hope that you will enjoy your new kitchen, thank you for sharing on the OMHGWW this week!!!
Have a great day!
Karren xoxo
I wish I could paint mine the doors have laminate on them and it is lifting in places so I just don't know what to do! I think I might need to buy some new doors! Thanks for sharing on Monday Madness link party :)
ReplyDeleteSharon, you could totally use the Cabinet Transformations on laminate, we did!! It worked wonderfully! You could just glue the laminate down and then use the Cabinet Transformations. I would try it since at this point what have you got to lose? It could save you tons of money too!
ReplyDeleteAwesome transformation! Thanks for sharing with us this week at Bloggers Brags. I am pinning this to our group board on Pinterest. Have a great week!
ReplyDeleteFantastic transformation! I REALLY want to paint my kitchen cabinets but Hubby is so not on board. I'm going to send him this post to see if I can change his mind. Thank you for sharing your experience. It's always easier to spend money on a product when someone else tests it first.
ReplyDeleteThanks Jen! You should go for it!! Tell your hubby it's only paint and can always be changed if you don't like it!
ReplyDeleteSeriously amazing transformation! We just moved into our new home (like not yet a week ago) and this is what the sellers did. I didn't like them at first, but they are growing on me, and I see what is missing now on mine, *knobs*. They look plain without them! Congratulations! Featuring these at Oh My Heartsie Girl Wordless Wednesday this week! Have a great rest of your week! xo Christine
ReplyDeleteThanks so much Christine! We didn't put the knobs on right away and it was a HUGE difference when we finally did! I think the knobs are almost as important as the paint at transforming the cabinets! I found that eBay has the best deals on knobs and pulls since they can be quite expensive.
ReplyDeleteI just want to clarify since we are about to do the same cabinet change.....you ended up buying the pure white correct? I love how this turned out and would like to do something along the same lines in my kitchen.
ReplyDeleteYes Danielle I used the Pure White kit :) keep me posted on your cabinet transformation, I would love to see pictures!!
ReplyDeleteI'm in the midst of doing mine pure white with the glaze. Did you have any issues with streaking when you applied the top clear coat? i've been reading that is the most difficult part of the project...
ReplyDeleteAll about the G's, I had no issues with the topcoat. I actually enjoyed putting it on ;). I made sure not to shake the can and I moved it around very carefully so that no bubbles would occur. One of my friends had issues but she used a dark base color. I have used the same dark base color on a dresser and again had no problems. Just be sure not to "rebrush" since it dries fast. It also seems to be somewhat self leveling so once you get the hang of it, it's pretty nice (especially since it's the last step ;)!) Good luck!!
ReplyDeleteThank you @Arthur Bryant! Sorry I haven't been receiving notifications of comments and for some reason I can't reply directly to anyone's comments! Please do keep me posted if you decide to try painting your cabinets!! I'd love to see pics of someone else's project using this technique ;)!
ReplyDeleteHow are your cabinets holding up with time?
ReplyDeletewhat color was the glaze please
ReplyDeleteThe glaze is dark brown. They sell the Rust-Oleum glaze separately at Home Depot.
Delete